SALES
+49 2351 925-223
Monday to Thursday: 7.00 am - 4.30 pm
Fridays 7.00 am - 2.00 pm

SUPPORT
+49 2351 925-299
Monday to Thursday: 8:00 am - 4:30 pm
Friday: 7:30 am - 2:30 pm

Do you have a question about our products? Here you will find answers to the most frequently asked questions and practical tips on all topics related to SELVE. Learn all about installation, maintenance, and features of our innovative products for roller shutters and sun protection. Be convinced by the quality and versatility of our "Made in Germany" solutions.
Reset filter x

No, this is not possible. Either a commeo remote control or an iveo remote control can be programmed into an SE Pro-RC radio roller shutter motor.

Yes, radio roller shutter motors with the suffix "-R" are compatible with iveo or intronic transmitters.

No, these are two different radio systems. Commeo transmitters can be programmed into radio roller shutter motors with the suffix “-RC” and “-com”. Older radio roller shutter motors with the suffix “-R” can be programmed with iveo transmitters.

The successor to the SEL Plus is called SE Pro.

The SE Pro roller shutter motor is the successor to the SEL Plus. All features of the SEL Plus have been carried over unchanged to the SE Pro. The SE Pro includes additional optional functions, and the motor tube is now gray instead of green.

The endpoints of the SE Pro motor can be set in two ways: automatically or manually.

Automatic endpoint setting (default mode)

  1. Move the motor in the UP direction until it reaches the upper stop and stops automatically.
  2. Hold the button – after 1–2 seconds, the motor will automatically move down.
  3. The motor moves to the lower stop (e.g., window sill) and stops.
  4. The endpoints are saved – perform a test run.

Manual endpoint setting (recommended for fixed shaft connectors)

  1. Connect the adjustment switch and press the E button for 6 seconds.
  2. Move the motor to the desired lower endpoint and press the E button for 3 seconds.
  3. Move the motor to the upper endpoint and press the E button again for 3 seconds.
  4. The endpoints are saved – perform a test run.

o manually set two fixed endpoints (bottom and top) on the SE Pro roller shutter motor, a SELVE adjustment switch is required (Art.-No. 290103 or 291009).

Step-by-step instructions:

  1. Connect the adjustment switch and hold the E button for 6 seconds → The motor signals manual adjustment mode.
  2. Move the motor to the desired lower endpoint.
  3. Press the E button for 3 seconds to save the lower endpoint.
  4. Move the motor to the desired upper endpoint.
  5. Press the E button again for 3 seconds to save the upper endpoint.
  6. Perform a test run to verify the settings.

Notes: After setting, obstacle detection (bottom) and overload protection (top) are active. If the endpoints were set incorrectly, a reset can be performed, and the endpoints can be reprogrammed.

The endpoints of the SE Pro-RC radio roller shutter motor can be set using a commeo remote control in two ways: automatically or manually.

Automatic endpoint setting (default mode)

  1. Put the remote control into SELECT mode → Press and hold the SELECT button for 3 seconds until the status LED slowly blinks orange.
  2. Press and hold the STOP button on the remote for 9 seconds to delete existing endpoints.
  3. Move the motor up using the UP button until it reaches the stop.
  4. Keep holding the UP button → The motor will automatically move down after 1–2 seconds.
  5. 5. The motor stops at the lower limit → Endpoints are saved.

Manual endpoint setting (if no stable stop is present)

  1. Put the remote control into SELECT mode → Press the SELECT button for 3 seconds.
  2. Press and hold the STOP button for 6 seconds to activate manual adjustment mode.
  3. Move the motor to the desired lower endpoint and hold the STOP button for 3 seconds to save it.
  4. Move the motor to the desired upper endpoint and hold the STOP button for another 3 seconds to save it.
  5. Perform a test run to verify the settings.

“RC” stands for “radio commeo” and identifies our radio drives, such as the “SE Pro-RC.” The suffix “-RC” means that all these radio drives can be controlled with both our current commeo radio system and the previous iveo system.

The jog mode allows you to move the roller shutter or awning with a short press of a button, without having to hold it down continuously. This function can be activated or deactivated via the configuration mode of the commeo remote control.

Step-by-step instructions:

  1. Put the transmitter in SELECT mode
  2. Press and hold the SELECT button for 3 seconds until the status LED blinks orange.
  3. The transmitter searches for connected receivers.
  4. Enter configuration mode. Enable/disable jog mode
  5. Press and hold the STOP and PROG buttons simultaneously for 3 seconds to enter configuration mode.
  6. Use the UP or DOWN button to adjust the setting:
  7. Green LED = Jog mode ON
  8. Red LED = Jog mode OFF
  9. Confirm the selection with the STOP button.
  10. Exit configuration mode
  11. Press and hold the STOP and PROG buttons again for 3 seconds to save the changes and exit the mode.

Group separation is done by resetting the existing group assignment on the radio-controlled roller shutter motor. The motor can then be assigned to a new group or an individual transmitter. This is done using the programming button on the radio transmitter. A detailed guide can be found in the respective user manual.

Our current roller shutter motors with the "-RC" suffix are designed to be operated with iveo transmitters as well. It is important to note that roller shutter motors with the "-com" suffix are not compatible with iveo. Motors with the "-com" suffix can only be used with commeo transmitters.

Yes, both the old radio system (iveo / intronic) and the new commeo radio system can be controlled with SELVE Home Server 2 or SELVE Home Server 3. Additionally, devices from Homematic IP can be operated.

A blue/orange blinking SELVE Home Server indicates a connection issue.

Possible causes:

  • Network connection interrupted → Check if the router is working and if the network cable is properly connected.
  • Server update or restart → Wait a few minutes to see if the connection is automatically restored.
  • Technical error → If the problem persists, unplug the device from power briefly and restart it.

In the "SELVE Home 3" app, under the network settings, the SELVE Home Server 3 can be connected to the new Wi-Fi. It should be ensured that the SELVE Home Server 3 is compatible with the new network.

The permissible crank force according to DIN EN 13659, Class 1, is a maximum of 30 N. For example, we have two bevel gearboxes, type 201000 (max. 8.5 Nm) and 201400 (max. 11.5 Nm). For exact values, please refer to the technical data of the respective product.

The permissible tensile force (15 mm and 23 mm belt width) according to DIN EN 13659, Class 1, is max. 90 N. For optimal durability, the belts should be regularly checked for wear.

The installation of an electric belt winder is simple and does not require complex wiring.

Installation:

  • Remove the old belt winder and take out the belt.
  • Attach the electric belt winder (flush-mounted or surface-mounted).
  • Insert the belt and set the end positions.
  • Connect to the power supply.

Maintenance:

  • Regularly check the belt for wear and replace if necessary.
  • Clean the device from dust and dirt.

The silent mode of the SE Solar-com ensures that the motor operates at a reduced speed of 7 rpm, making it particularly quiet.

How to activate silent mode with the commeo Multi Send remote control:

  • Open the main menu.
  • Press the menu button on the commeo Multi Send.
  • Select "Settings."
  • Use the arrow keys to navigate to the "Device Parameters" menu and confirm with the STOP button.
  • Activate silent mode.
  • Select the "Silent Mode" option and confirm with the STOP button.
  • Set the option to "ON."
  • Save the setting.
  • Confirm the selection and exit the menu.

Note: Silent mode can only be activated with the commeo Multi Send.

Yes, intermediate positions can be programmed in the SE Solar-com. This allows for convenient use, such as automatically moving the roller shutter to a preferred ventilation or shading position.

How to set an intermediate position:

  • Move the roller shutter to the desired position.
  • Use the desired commeo transmitter:
  • Press the UP and DOWN buttons simultaneously until the roller shutter makes a brief up-down movement.
  • Save the intermediate position:
  • Press the STOP button for about 3 seconds until the storage is confirmed by another up-down movement.
  • To recall the intermediate position, simply press the STOP button briefly.

The maximum load is approximately 20 kg roller shutter weight at 2.5 meters shutter height with 10 Nm.

In principle, SELVE drives may only be operated with original SELVE accessories. This applies not only to the battery and panel but also to all accessories for the SE Solar-com solar motor.

No, the SE Solar-com does not have a built-in sun automation function. However, the drive can be combined with the SELVE light sensor commeo Light Send to enable automatic shading based on sunlight intensity.

The solar panel of the SE Solar-com has an IPX4 protection rating, which means it is protected against splashing water from all directions. This makes it suitable for outdoor installation as long as it is not exposed to direct water jets or submersion.

An additional solar panel may be necessary if the first panel does not receive enough sunlight. This can occur when:

  • The solar panel is shaded, e.g., by trees, buildings, or balconies.
  • The alignment and tilt angle are not optimal, resulting in low solar energy absorption.
  • The roller shutter is operated more than twice a day, or sunlight is limited for extended periods (e.g., during winter months).

Solution:
Using a Y-cable (Art. No. 290710), a second solar panel can be connected to increase charging capacity and ensure the reliable operation of the solar motor.

More information about SE Solar-com

No, a special flush-mounted box for installing the SE Solar-com solar panel is not available. However, the solar panel can be mounted in two ways:

  • Screw mounting:
  • The solar panel has screw holes (Ø 5.1 mm) for secure installation on various surfaces.
  • Adhesive mounting:
  • Alternatively, the panel can be attached using 3M adhesive strips. It is important to thoroughly degrease the surface beforehand.
  • For optimal alignment with the sun, additional mounting brackets (Art. No. 290737) can be used.

More information about SE Solar-com

To ensure that the SE Solar-com receives sufficient energy at all times, the solar panel should be optimally aligned with the sun.

Recommended positioning:

  • Orientation: Ideally, the panel should be installed facing south to maximize solar energy intake.
  • Tilt angle: An angle of 30° to 40° is optimal to make the best use of sunlight throughout the day.
  • Unobstructed sunlight: The panel should not be installed behind glass and should be protected from permanent shading (e.g., by trees or buildings).

Mounting options:

  • Screw mounting: Direct attachment with screws (Ø 5.1 mm).
  • Adhesive mounting: Using 3M adhesive strips on smooth, cleaned surfaces.

Additional tips:

If the solar energy is insufficient, a second solar panel can be connected using a Y-cable (Art. No. 290710). An extension cable (2.50 m or 5.00 m) allows for more flexible placement if the optimal mounting location is not directly on the roller shutter box.

More information about SE Solar-com

Yes, the cable of the solar panel can be extended using an extension cable. SELVE offers two options:

  • 2.50 m extension cable (Art. No. 290720)
  • 5.00 m extension cable (Art. No. 290721)

Installation instructions:

  • The extension cable is plugged between the motor and the solar panel.
  • It must be laid in a cable duct or protective tube and must not be exposed to direct weather conditions.
  • The cable outlet from the housing should be protected against moisture.

More information about SE Solar-com

Yes, to ensure optimal performance of the SE Solar-com solar panel, it should be cleaned regularly.

Recommended cleaning method:

  • Use clear water and a soft cloth.
  • Remove stubborn dirt with a mild, non-abrasive cleaning agent.
  • Do not use high-pressure cleaners or aggressive chemicals, as they could damage the surface.

Important notes:

  • The solar panel should not be permanently covered by dirt, leaves, or snow.
  • Regular visual inspections and cleaning ensure maximum energy absorption.

More information about SE Solar-com

No, the SELVE solar panel is designed and tested exclusively for operation with the SE Solar-com. It is not compatible with motors from other manufacturers.

Important reasons:

  • The solar panel operates with a specially calibrated 12V NiMH battery optimized for the SE Solar-com.
  • The electrical connection and charging electronics are specifically designed for SELVE system components.
  • Using it with other motors could lead to malfunctions or damage to the components.

More information about SE Solar-com

Yes, with the included mounting brackets (Art. No. 290737), a stepless tilt adjustment is possible.

Mounting options for optimal alignment:

  • Direct mounting: The solar panel can be attached using screw holes or 3M adhesive strips.
  • Mounting with brackets: Allows individual adjustment of the angle to maximize solar radiation.
  • Optimal tilt angle: A tilt angle of 30° to 40° and a south-facing orientation ensure maximum energy yield.

More information about SE Solar-com

Charging options:

  • The external charging process of the SE Solar-com battery takes approximately 3-4 hours when charged directly with the charger (Art. 290760) and approximately 10-12 hours via the external charging socket (Art. No. 290785).
  • During the charging process, the commeo Multi Send remote control displays the charging status.

More information about SE Solar-com

The battery of the SE Solar-com has a nominal capacity of 12 V / 2200 mAh and is based on Nickel-Metal Hydride (NiMH) technology.

Additional technical details:

  • Dimensions: Ø 24 mm, length 430 mm
  • Cable length: 100 mm
  • Schutzart: IP44 (Schutz gegen Spritzwasser)
  • Autonomy: Up to 40 days of operation without recharging, with a load of approximately 8 kg and 2 operating cycles per day.

More information, user manuals, and instructional videos about SE Solar-com can be found here

The external charging socket (Art. No. 290780) can be mounted either at the bottom of the guide rail or on the box cover. These positions provide easy access for manually recharging the battery.

Installation instructions:

  • Choose position: It is best to mount it on the box cover or the lower guide rail.
  • Prepare drilling: The charging socket is inserted through a hole with the threaded section:
  • Ø 8 mm without rubber grommet
  • Ø 15 mm with rubber grommet
  • Connect terminals: Plug the connectors of the charging socket into the solar panel and the drive.
  • Check functionality: The charging process can be monitored using the commeo Multi Send remote control (PREMIUM version).

More information about SE Solar-com

Yes, the external charging socket (Art. No. 290780) can also be mounted inside the roller shutter box. It allows the battery to be recharged using a power adapter (Art. No. 290785) if the solar panel does not provide enough energy.

Mounting options:

  • The charging socket can be installed on the box cover or the lower guide rail for easier access.
  • The cables of the external charging socket are designed for direct connection to the solar panel and the drive.
  • For a compact installation, mounting on the box cover is recommended, as the socket remains protected and easily accessible.

More information about SE Solar-com

The SE Solar-com can operate for up to 40 days on a fully charged battery without recharging. This estimate applies under the following conditions:

  • Maximum load of 8 kg curtain weight
  • Two operating cycles per day (Up/Down)
  • Includes standby power consumption

The actual runtime may vary depending on temperature, battery aging, and sunlight exposure. During extended periods of bad weather, recharging via an external charging socket (Art. No. 290780) may be required.

More information about SE Solar-com

The battery of the SE Solar-com is delivered by SELVE with a charge level of 60 to 80%. However, storage may gradually reduce its capacity.

Recommended procedure before commissioning:

  • Fully charge the battery before installation and use – this ensures that full capacity is available.
  • Check the charge status indicator on the charger:
  • Orange LED: Fast charging in progress
  • Green LED: Battery is fully charged and in maintenance mode

A fully charged battery allows up to 40 days of operation without recharging, assuming 2 operating cycles per day and a maximum load of 8 kg.

More information about SE Solar-com

The battery of the SE Solar-com is maintenance-free and does not require regular servicing or replacement.

Important usage tips:

  • Regular charge monitoring: The charge level can be checked using the commeo Multi Send remote control.
  • Consider temperature effects: Extreme cold or heat can affect battery performance.
  • Avoid long idle periods: If the battery is not used for an extended period, it should be fully charged before storage to prevent deep discharge.

If the battery still loses performance over time, it can be easily replaced with a spare part (Art. No. 290730).

More information about SE Solar-com

No, the battery of the SE Solar-com cannot be overcharged. The system features integrated charging electronics that automatically regulate the charging process.

Safety mechanisms:

  • The charge control stops the charging process as soon as the battery is fully charged.
  • A maintenance charge keeps the battery at an optimal level without overloading it.
  • The commeo Multi Send remote control displays the charging status in five levels.

The system is designed to ensure a long battery lifespan and enable safe usage.

More information about SE Solar-com

No, the battery of the SE Solar-com is exclusively designed for operation with the SELVE solar motor SE Solar-com. SELVE does not authorize the use of its accessories with roller shutter motors from other manufacturers.

More information about SE Solar-com

Yes, the SE Solar-com features obstacle detection in the downward direction as well as a self-learning overload protection (freeze protection) in the upward direction.

More information about SE Solar-com

The use of a solar motor is not recommended if the operating conditions cannot ensure reliable solar operation. This is particularly the case in the following situations:

  • Permanent shading: If the solar panel does not receive direct sunlight for long periods, e.g., due to buildings, trees, or balconies. Insufficient light exposure may lead to insufficient battery charging.
  • Incorrect installation conditions: The solar panel must not be mounted behind glass, as this significantly reduces energy absorption. The optimal orientation (south-facing, 30°–40° tilt) may not be achievable.
  • High usage demand: If the roller shutter operates more than two cycles per day, the battery may discharge faster than it can be recharged.
  • Low temperatures: Extreme cold can reduce battery performance and extend charging times.
  • Heavy roller shutters: The SE Solar-com is designed for a maximum of 20 kg at 10 Nm.

More information about SE Solar-com

Unfortunately there are no results for your search.

Have you already seen our numerous explainer videos?

Here we explain how to set up and operate many of our products. Take a look!

To the explainer videos

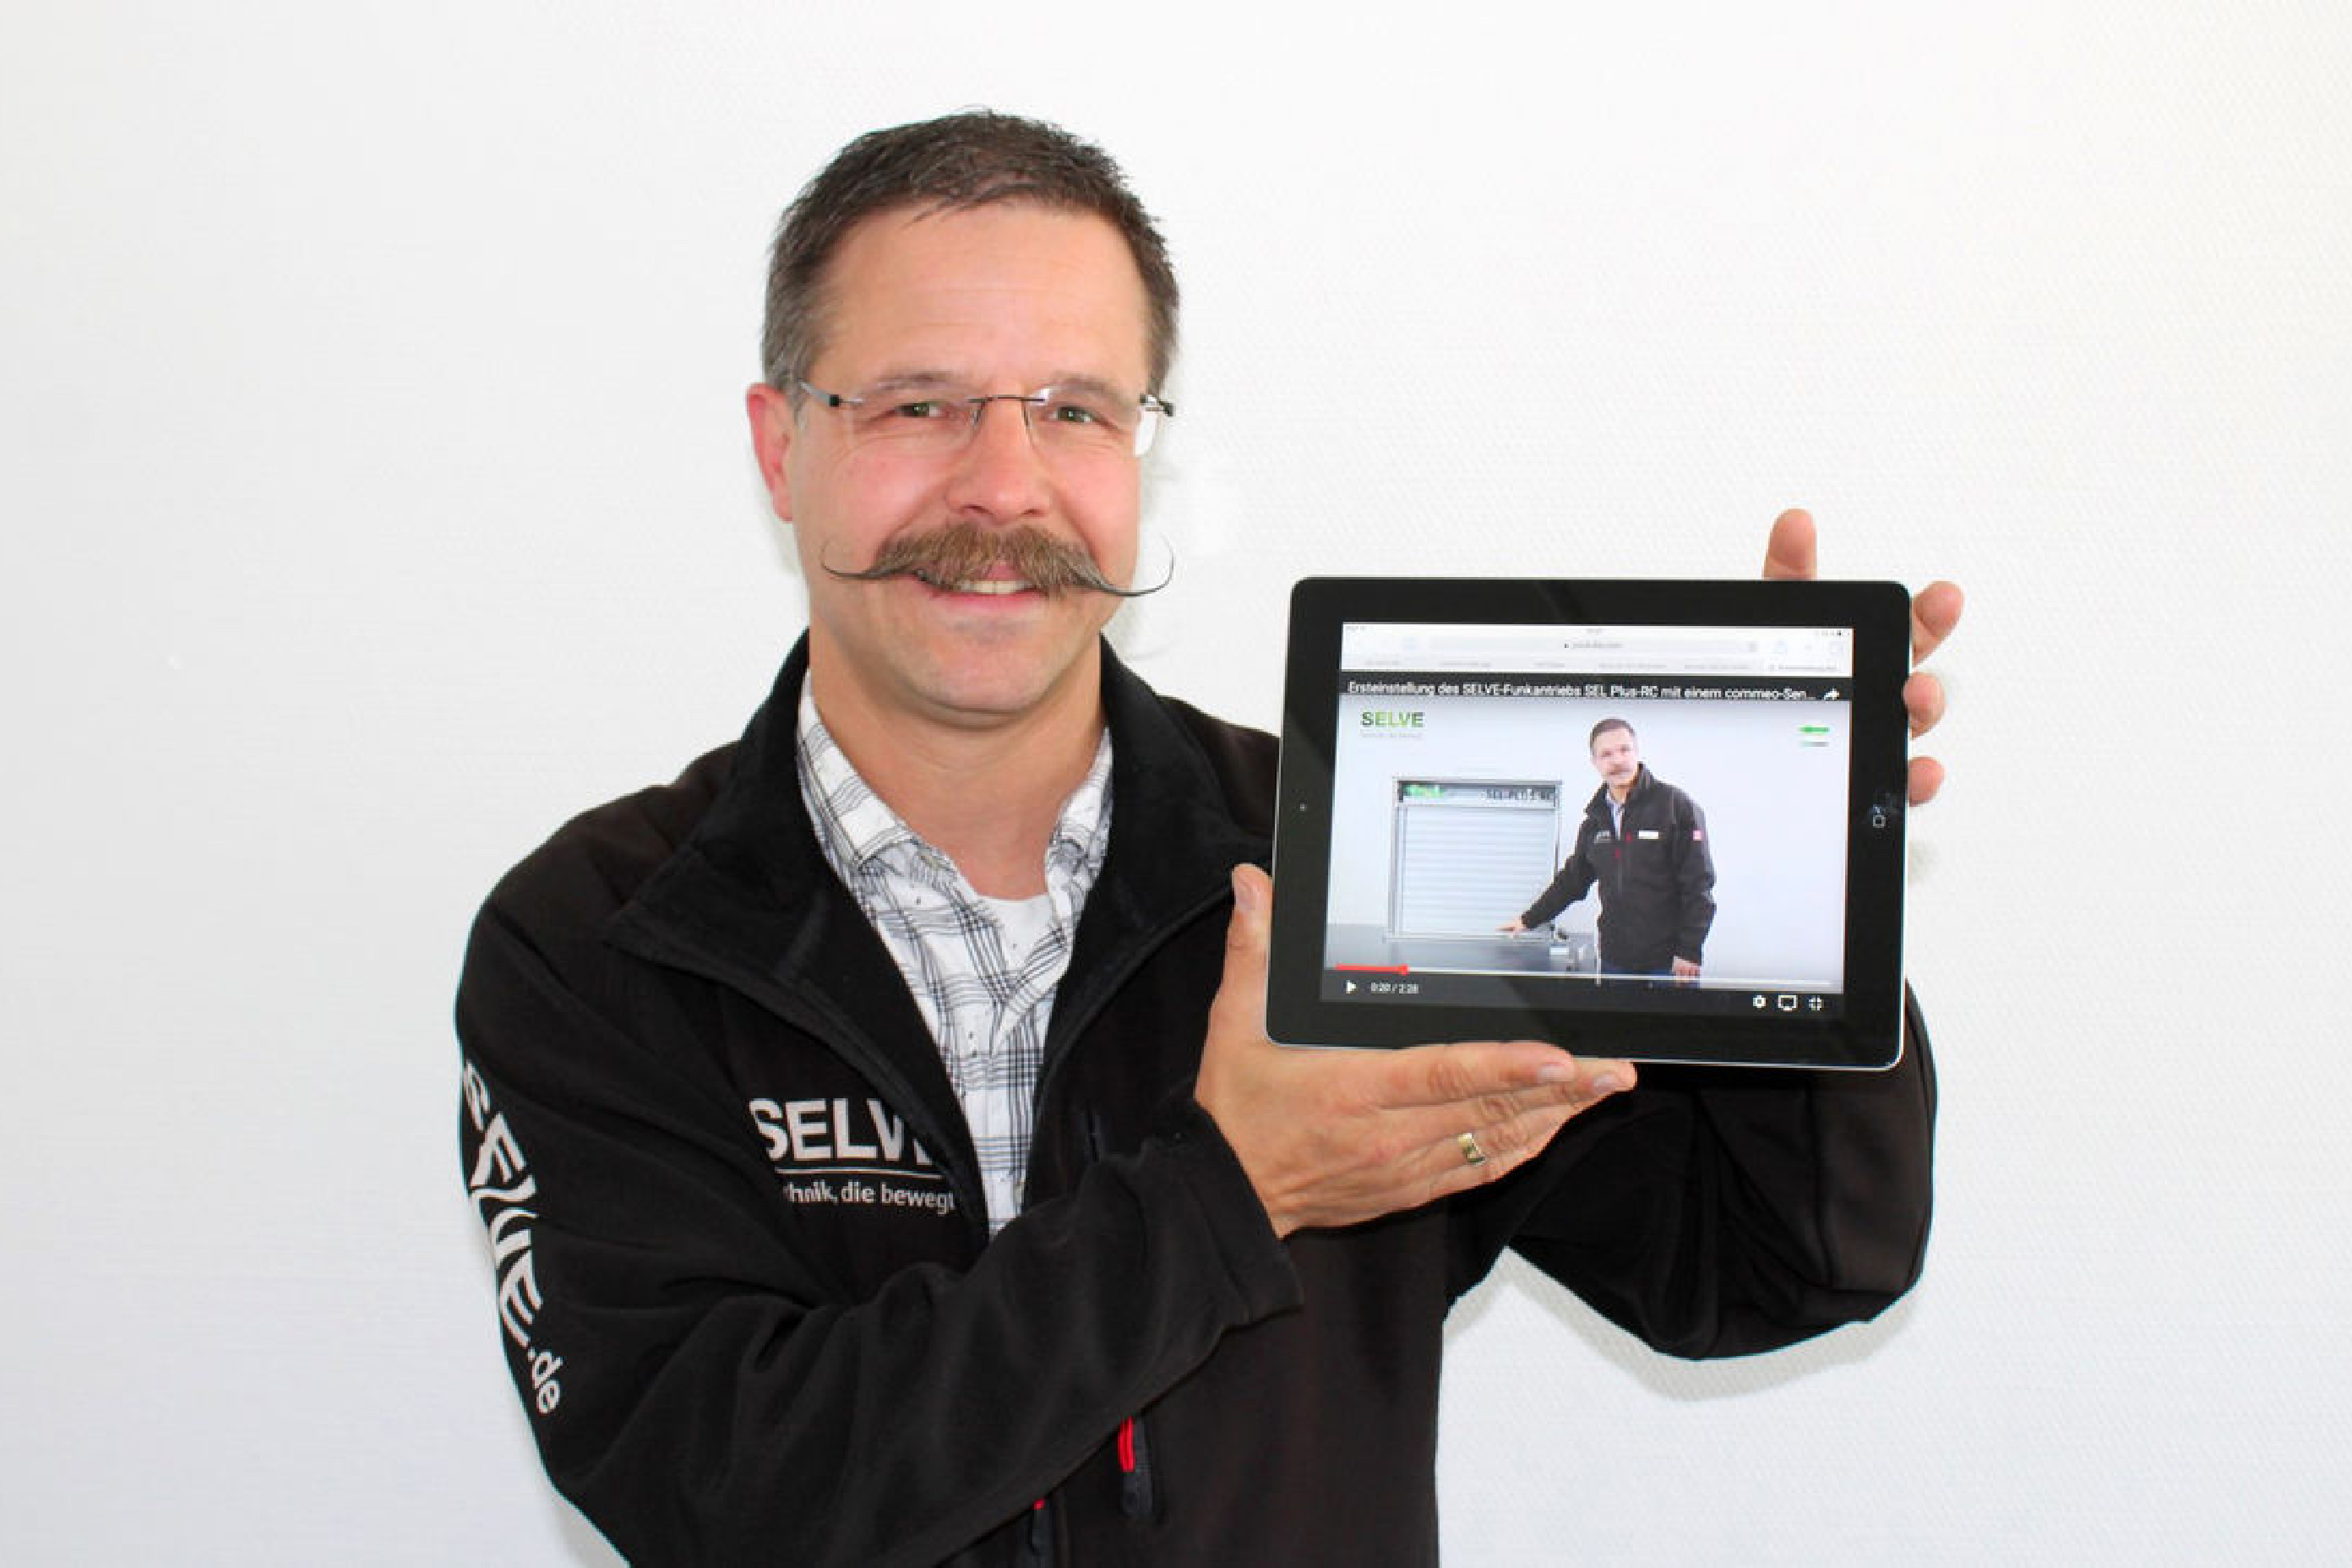
Looking for operating instructions, brochures, or catalogs?

You can find everything in our download section.

To the downloads

Do you have questions about our products?

Contact our support team.

To support